Creating a portal to the Middle East
- Nat AKA Decor NATion
- Feb 4, 2017
- 6 min read
Ok so not quite! I haven't mastered the art of teleportation or managed to re-create Stargate SG1 in my partners living room! I have, however, successfully installed paste the paper Anaglypta wallpaper and not screwed it up! WINNING!
Now here you are thinking...... Anaglypta? Middle East? Stargate SG1? WTF is this girl on about? Well all will be revealed.

The brief was quite simple:
Fill and awkward living room wall with a pop of colour and add some interest.
Now for those of you who are unfamiliar with wall papering techniques and are keen to do it yourself I suggest you read on carefully. For those of you who just want to see what it looks like, then I suggest you scroll right to the bottom cause Sh** is about to get complicated!
Feature walls are still all the rage! They are the perfect way to introduce colour/texture/pattern into a room. If you are like me and LOVE all three then this is perfect for you! Along with the obvious aesthetic reasons for using wallpaper, there are also some very practical reasons to commit to using this material.
Wall papering is the method of choice for older houses that have imperfections in the walls caused from wear and tear or age. In our case, there were lots of holes and a very bad plaster job from the previous owner! Perfect excuse to add some interest to the wall (Plus haven't mastered the skim coating of plaster....... yet!)
"Anaglypta" refers to a type of very heavy patterned wall paper. Not only does it cover up bad walls it is also painted! Yes, you paint it!!! So you can match what ever colour you like! All Anaglypta style wall paper needs to be painted. So when buying wall paper remember, Anaglypta style wallpaper = buying wall paper + paint to cover it.
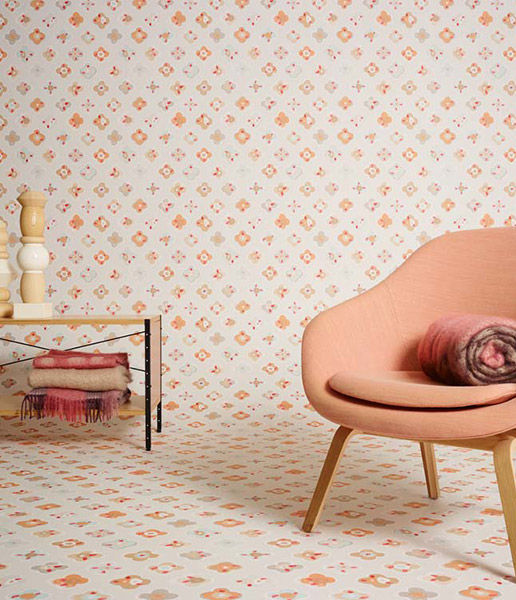
So I found this awesome Middle Eastern designed Anaglypta at Resene Paints. This is supplied by Aspiring Wallcoverings.

My partner loved it! We chose the perfect colour to compliment it's Exotic feel, Resene Moroccan Spice! A beautifully rich burnt orange.

So now you've chosen the most tactile wall paper you can find, fell in love with the perfect colour to enhance all that glorious texture and found a helper! Time to get stuck in!
First things First! Make sure your wall is prepared to the correct standard to hang your wall paper. If it is bare gib and plaster you will need to apply a pigmented sealer as a base coat. This will help your glue and size absorb evenly and stop the plaster from being pulled out when the paper drys. If you already have wall paper on then STOP! STRIP ALL WALLPAPER BEFORE CONTINUING! Don't apply wall paper to wallpaper, please. You are just adding another layer to your walls, adding extra weight which can pull away from the wall. No body wants a rippled, saggy finish. Also you are some ones worse nightmare when they buy this house from you and decide to strip the old saggy wall paper that wasn't hung properly. Trust me! I have had so many people tell me that the wall paper was a B**ch to get off cause there were so many layers! In this case we had an already painted surface. It was water based paint (check by rubbing a methylated spirit soaked rag on the paint. If it transfers then it is water based) which needed to be Oil based paint. Wall paper glues don't react great to the water based paints and also do not hold back any old stains in the walls. Most wall paper will require a oil based undercoat of some sort, appropriate to the surface.
Then you want to apply a coat of Size. This helps with slipping the pattern into place and also priming the surface for the paste. This can be done a day in advance.

Now the surface is prepped it is time for the messy part (And you thought painting was messy)
Do you have the following handy?
- Sharp craft knife with extra blades (you should replace these after every cut to give a good clean finish)
- Scissors
- Measuring tape
- Level or Plumb bob
- Pasting brush
- Trim guide
- Bucket for mixing paste
- Bucket full of warm soapy water
- Wallpaper smoother
- Clean towel or sponge for wiping excess paste off the wallpaper
First step:

Measure the width of your wallpaper roll. Now using a pencil mark a line around 8-12mm less than this out from the edge of the wall that you are going to start at. You will use this mark to help you draw a perfectly vertical line from the ceiling down to the floor. This can be done using a Plumb Bob (basically a string with a weight at one end) or a level. This line will be where you will line up the first drop of wall paper. Because you set this line out from the wall at just short of a width of your paper, it will give you a bit of over hang which you can trim off. Most walls are not perfectly square at the edges so this is an important step to make sure you don't end up with a wonky pattern.
Second step:
Measure and cut your lengths of wall paper. So we knew that the ceiling height was 2.4m so we cut our first length a bit longer than this and laid it out on the ground. We then stretched out the roll beside it and matched the pattern up. Then once it was matched up perfectly we cut the second drop. Do this for each drop.

Third Step:
Mix up your paste as per the instructions on the package. This is a particularly heavy paper so I used a very thick mixture of paste. Apply this to the back end of the paper using either a pasting brush or a roller (watch out for splash back with the roller) Then "book end" the paper. This is a method of folding the paper into each other so that it can "relax". Basically it lets the glue absorb, without drying out, allowing the paper to expand and contract. If you don't do this then you can run into issues once it is hung, where the paper might shrink once dry, leaving gaps between your drops. This usually takes 10-15 mins for it to do it's thing.
Tea break!!!

Fourth Step:
Hanging time!
Once the paper has relaxed you can hang your first drop. I put extra paste on the wall to make sure I hadn't missed any bit. This was not going to fall off!
Take the paper gently to the wall and line the first drop up with the line you made earlier using the plumb bob or level. Don't worry if there is over lap at the top and bottom or at the walls edge. Smooth this out using a paper smoother or your hands.

Then cut of any extra over hang with a trim guide and a very sharp craft knife. Snap the blade every cut if necessary!

Continue this method for every drop. Wipe of any excess glue oozing out between the drops with a warm, damp sponge.
As you can see below, our wall was very small so we only needed three drops.

Fifth step:
Wait.
Once dry it can be painted!!!

Seek manufacturers advice on how to paint your wall paper. Some require special undercoats so that the paint will dry properly. A lot of wall paper is vinyl coated and when water based paint is applied directly to the surface it reacts with the plastics in the coating and makes the wall sticky!
THE FINAL PRODUCT
Applying Resene Spacecote Low Sheen - Moroccan Spice

Although it seemed daunting at first it turned out to be quite straight forward. I suggest watching a video first so that you can wrap your head around what you will be doing. Just make sure you look up the right video for which type of paper you are hanging. Also make sure you are prepared!!
This is a super handy guide you can pick up from Resene:
http://www.resene.co.nz/homeown/how_to_diy/wallpapering.pdf
My partner was so pleased with the result! He reckons it looks like a portal to the Middle East!
Nothing beats brightening up your interior with some colour and adding a little texture for interest. I am totally hooked on wall papering!

